


Another name for this dessert is Piece Montée (read piece mon-teh) which could be translated as "a piece of mountain". The cone shape can be altered into something completely different (I've seen a beautiful croquembouche castle!). It's the most popular wedding cake in France.

Before I get to my talking I'll explain more theory. The next would be profiterols. A profiterole is known as a cream puff in English speaking countries. It's a pastry made from French dough "pate a choux" (read pah-teh a shoe) which you probably know as choux pastry. This is the only type of dough that's cooked before it's baked and this method ensures that it'll puff during baking so that the final cream puff is three times bigger than before the baking. A single puff cannot be called a cream puff/profiterole unless it's filled with pastry cream - in French crème pâtissière.
Crème pâtissière is a type of custard that is thickened with starch (usually cornstarch). It consists of just a few basic ingredients: whole milk, eggs, egg yolks, starch and sugar. Then different flavourings may be added - such as vanilla (the most basic and usual one), chocolate, coffee, coconut, caramel etc. Possibilities are endless. The crème is then used in many French pastries - profiterols, eclairs, mille-feuille, cakes ( = gâteaus) etc.

Since my parents' birthdays are almost on the same day their celebration is on the same day. That's good for me because I don't have to prepare two b-day cakes (not that I'd mind that but still :D) and be afraid that mom will have better cake than daddy and vice versa. This is not the first time I've made croquembouche. I made it for the first time exactly one year ago when it was the May DB challenge. I was so amazed by this cake and I guess everyone has to be amazed, too. It's like nothing I've ever seen. My sister was there to help me prepare it. It was a huge hit, but there were some small mistakes I wanted to avoid this time. Our profiterols didn't puff as much as we'd like. We also kind of misunderstood the whole construction thing, so we ended up using a glass bowl as a structure. I have to say the final result was really nice as long as it was untouched. When we started eating the cake the bowl was discovered and the charm got lost a bit :D Anyway, it was delicious and stood in my memories. So I've decided to make the perfect croquembouche for my parents this year.
I love crème pâtissière. I've made the basic vanilla one, coffee, chocolate (my favourite one so far), apricot and coconut crème pâtissière. All of these were wonderful, but I wanted to try out yet another one. My parents love strawberries so I didn't have to think for a long time. However, one type of filling wouldn't be enough so I chose to make caramel cream, too. I've already made the caramel cream (the recipe comes from Martha Stewart's page), followed the instructions to the T and ended up with burnt caramel (and I'm not the only one) plus the directions are a bit too complicated. So this time I twisted the recipe a bit and the cream came out great!

For the supporting cone structure you may want to use a piece of cardboard which you form into a cone shape, cover with baking paper and then you "glue" the profiterols onto it with the glaze. Here is a great video that shows how to make your own paper cone (I followed this one). However, feel free not to use it and make it free form instead. In this case you may need more profiterols to make a big cake, because you can't make it hollow - the croquembouche wouldn't hold its shape and it would the most likely collaps.

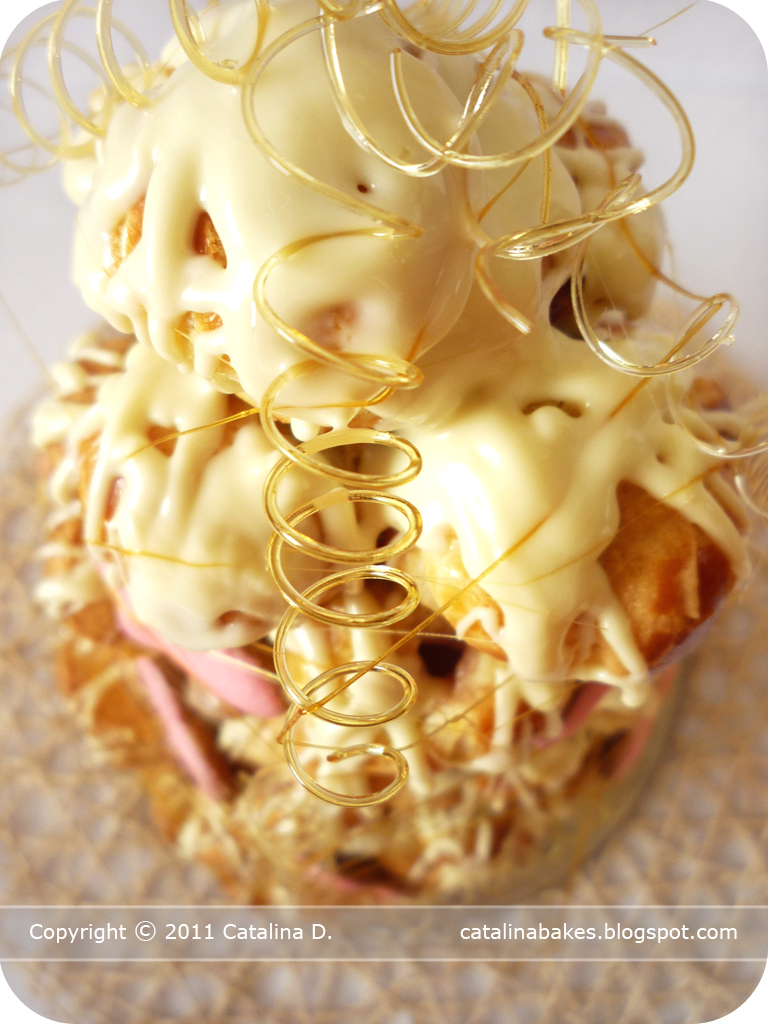
I decorated mine with French almonds, heart-shaped spiced cookies, white chocolate and caramel spirals. I wanted to keep my piece montée "clean" looking so that it'd look more elegant and smart, but feel free to decorate it as desired :)
All recipes I used for this Croquembouche are a summary of many recipes I've read on French sites and in French books (my sister helped me with this, because I can't speak French unlike her - I only can help you with English, Czech and Spanish :D). The recipe for pate a choux is now my favourite one and I'm really happy every time I use it - it always gives me the best puffed results, though the DB one wasn't bad at all, I find this one better.

Ingredients:
Pâte a choux:
250ml (1 cup + 1 tbsp) milk
95g (6-1/3 tbsp) unsalted butter
a big pinch of salt
12g (1 tbsp) granulated sugar
150g (1 cup + 3 tbsp) all-purpose flour, sifted
5 medium size!! eggs
Strawberry Crème Pâtissière:
250ml (1 cup + 1 tbsp) whole milk
25g (3 tbsp) cornstarch
120g (2/3 cup) granulated sugar
1 large egg
2 large egg yolks
30g (2 tbsp) butter
1/2 vanilla pod
200g (about 1 cup) strawberry puree
Caramel Cream:
300g (1-1/2 cup)granulated sugar
480ml (2 cups) whipping cream
60g (1/4 cup) sour cream
 1 tsp pure vanilla extract
a pinch of coarse salt
Caramel Glaze:
200g (1 cup) granulated sugar
80g (1/4 cup) light corn syrup
60ml (1/4 cup) water
Decoration:
100g good quality white chocolate
20 French almonds
10 decorated heart-shaped cookies
Directions:
Pate a choux: Combine milk, butter, salt and sugar in a saucepan over medium heat. Stirring with wooden spoon occasionally, bring to a boil. At boil, remove from heat and mix in flour, stirring to combine completely. Return to heat and cook, stirring constantly until the dough dries slightly and begins to pull away from the sides of the pan. This is very important and may take from 5 to 10 minutes. The dough is dried when you can see a thin layer of it "glued" to the bottom of the pan - don't try to remove it, just let it be. Transfer to a bowl and stir with a wooden spoon for 2 minutes to cool slightly (the dough's temperature should be no more than 60C). Add 1 egg. The dough won't seem to come together but it will, just continue stirring. When it looks like dry mashed potatoes, add another egg. Always beat the egg in well. Repeat until you have incorporated all eggs. Transfer the dough into a pastry bag with a 1cm plain tip. Pipe the puffs 2cm apart in lined baking sheets. Each puff should be about 2,5cm high and wide (it's better to make them higher rather than wider). Using your finger dipped in hot water, gently press down any tips that have formed on the top of puffs when piping. Bake the puffs in well-preheated oven to 200C for about 10 minutes (DO NOT open your oven during this time otherwise you'll end up with flat puffs!!), then lower the temperature to 170C and bake for about 3-6 minutes (now you can turn the baking sheets in the oven to ensure even baking). Turn off the oven and let the puffs sit in it for another 5 minutes. Now remove from oven and let cool completely.

Strawberry Crème Pâtissière: Dissolve cornstarch in a little of the 250ml whole milk. Beat in whole egg and then egg yolks until well-incorporated. Pour the remaining milk in a saucepan, add sugar, scraped vanilla seeds and also the vanilla pod. Bring this mixture to boil and remove from heat. Pour a little of the boiling milk mixture into the egg mixture, whisking constantly so that the eggs don't curdle (this will temper your eggs). Return the remaining milk mixture to boil. Pour in the hot egg mixture in a thin stream, whisking constantly. Do not stop whisking!! and bring to boil. The cream thickens. Boil for about 1 minute, then remove from heat, still whisking. Add butter, remove the vanilla pod and then add strawberry puree. Pour in a bowl, immediately press plastic wrap firmly against the surface and let cool a bit. Then refrigerate for at least 2 hours.
Caramel Cream: Heat sugar in a medium saucepan over medium-high heat until sugar turns amber (watch carefully! - dark amber means your caramel is a bit burned and bitter tasting). Immediately remove from heat, let cool for 3 minutes and carefully whisk in 240ml (1 cup) cream. Return to low heat, and cook until sugar melts completely and mixture boils (this may take even 15 minutes). Remove from heat, and pour into a bowl set in ice-water bath. Let caramel cool, stirring often, for 10 minutes. Stir in sour cream, vanilla, and salt. Cover and refrigerate at least 2 hours or up to 5 days. Just before using, beat remaining 240ml (1 cup) cream until stiff peaks form. Gently fold into caramel sauce, using a rubber spatula, until incorporated. Whisk to thicken, about 1 minute.
Caramel Glaze: Combine sugar, water, and corn syrup in a medium saucepan over medium-high heat, and stir until the sugar dissolves. Cover the saucepan with a lid and boil for 2-3 minutes, then remove the lid and continue to boil the sugar syrup, stirring occasionally, until it changes colour to light amber. Remove the saucepan from the heat and use immediately. If it thickens too much, just reheat it again.
Assembly: Fill each cream into a pastry bag fitted with narrow plain tip. Pierce the bottom of each puff using the pastry bag and fill the puff with the filling. I try to have the same amount of caramel profiterols as well as strawberry profiterols. You may not need all of the puffs nor all of the filling. Set aside. Using the caramel glaze, glue your paper cone to the plate you want to serve your cake on. Dip each profiterol's bottom in the caramel glaze and glue it to the paper cone. Start at the bottom of the cone and continue dipping and adding profiterols in levels using the glaze to hold them together as you build up. When done, it's time to decorate. I melted the chocolate in double boiler, and drizzled the cake a bit. Then I used the glaze again to glue the cookies and almonds to it. Finally, I used the leftover glaze to make caramel spirals and spun sugar. Serve as soon as possible!


- The strawberry creme patissiere is a bit runny because of the strawberry purre. It's quite messy but in the end it doesn't run from the profiterols. I refrigerate it overnight to make it as thick as possible.
- Both creams are quite sweet, but that's a must! The puff will "steal" a lot of that sweetness and in the end sweet just OK.
- You can make the caramel cream and the other one a day ahead.
- My cone was about 30cm high and 15cm wide. I used about 80 small profiterols and that's the exact amount I got from this one amount of dough. You may make a double batch to ensure you'll have enough profiterols for your piece montée. The unfilled leftover profiterols freeze really well!
- Instead of spiced cookies you can use any other type of cookie suitable for decorating or you can leave it.
- Asking how to eat this thingie? Simply pull apart one profiterol after another and another and another until there's nothing left :D Thanks to the baking paper, it's really very easy to pull apart the whole profiterol without leaving the glued bottom on the cone.

Verdict:
Whoa, I have to say I'm pretty exhausted. Two days of preparation (not whole, but still pretty hard), starving (to be able to eat the whole thing) and finally - the Croquembouche is here. Or was - we ate it within one hour. It's so delicious not to mention that my parents were so surprised and amazed to see something like that :D The baked dough is as light as the air with subtle milky buttery flavour, melting on your tongue. Strawberry creme patissiere is sweet, light, fresh and fruity - my big favourite! The caramel cream is light, too, but also heavy at the same time with creamy dreamy texture and perfect caramel flavour. The glaze is really crunchy, but I made only thin layer, so it wasn't annoying at all. I'd love to talk about this extremely delicious king of all cakes for much longer but I guess it'd get too boring :D Just make it on some special occasion and I bet everyone will be staring at it like "Oh my God!". This is a jaw-dropping thing!
Linked to:
Sweet Treats Thursday
Whisking Wednesdays
These Chicks Cooked
A Themed Bakers Sunday


oh wow, what a masterpiece..amazing :)
ReplyDeleteGreat creation, you did a wonderful job. The profiteroles look light, crispy and fluffy, just the way it should be! Two days is a lot of effort but for two birthdays it is worth it!
ReplyDeletewow wow wow! what an amazing, breathtaking piece! it's like a piece of art really..so perfect that it should stand on a pedestal at some cake museum..you're a real master of baking!
ReplyDeleteChocoRRoL (LuBA): Thank you :)
ReplyDeleteThree-Cookies: Thank you! In fact, it didn't take whole two days, but only about 8 to 9 hours when counted together which still is quite a lot of time, so piece montée probably won't be my everyday-made dessert :D However, as you say, for my parents' b-day I'd do it again and again :)
evitchka(in-spired-me): Thank you so much :) I only tried to do my best 'cause of the b-day. I'm really happy you like it :)
A beautiful job, Catalina. I can imagine how amazed your parents were. A true labor of love.
ReplyDeleteI've been wanting to repeat this challenge like forever... it was my favorite challenge so far, not only because I enjoyed making it immensely, but also because I was going through a very special moment in my life... unforgettable! Now I'm waiting for a special occasion to make one, and celebrating your parents birthday must have been something very special for them.
ReplyDeleteIt looks amazing, as everything you do!
WOW! I always wanted to try to make this. Thanks for the great tutorial.
ReplyDeleteWow! So very impressive! What an amazing gift for your parents! Thanks for sharing.
ReplyDeleteThat is beautiful. Like a piece of art. Very impressive!
ReplyDeletemickey
Your Croquembouche is amazing! My mother-in-law was French and she often spoke of the delicious Croquembouche she had in France.
ReplyDeleteSimona: Thank you, Simona :)
ReplyDeleteRenata: Thank you! I enjoyed the challenge a lot, too, it was one of my most favourite ones :)
ladybehindthecurtain.com: You're welcome :) I hope the tutorial'll be useful :)
laxsupermom: Thank you :) and you're welcome :))
Mickey: Thank you so much :)
Jan: I'm happy you like it and thank you a lot :))
WOW!!! Your Croquembouche looks absolutely beautiful! And your photos are just stunning! I saw your link on This Chick Cooks. I linked up my Strawberry bread if you'd like to check out my blog. I am now following you!
ReplyDeleteReally gorgeous! How sweet of you to make it for your parents.
ReplyDeleteThis is gorgeous! I have always wanted to make one, but they just seem so time consuming and difficult. Yours is absolutely stunning though.
ReplyDeleteFabulous. The croq has been on my bucket list forever. And, this will be the year. I'm waiting to lose my last 10 (of 20) pounds and then it will be my big celebration. Your presentation is stunning. Found you via pinterest.
ReplyDeleteI love this!! This looks so yummy!!! I am your newest follower. If you would take a look over to my blog that would be wonderful!! I am just starting out, but I am excited to share new ideas on recipes, crafts, and mineral makeup. I will also be giving out free make-up on giveaways. So take a peek!!
ReplyDeleteThanks,
Brooke
for-the-love-of.blogspot.com
My mom has always wanted to make this but she's shied away from the procedure.Now we both want to make the croquembouche after seeing your post.
ReplyDeleteBtw, your strawberry cream should taste fantastic.
Bundle
This is totally amazing. It is like a delicious work of art. You did a great job on it. I love it :) Thanks so much for sharing your awesome croquembouche at the recipe spotlight.
ReplyDeleteKatie
Um wow. I just pinned this on Pinterest. And I am passing the Versatile Blogger Award on to you! Check out my post and pick up your badge! Loving your blog :) And your croquembouche is magnificent!
ReplyDeletehttp://steaknpotatoeskindagurl.blogspot.com/2011/06/versatile-blogger-award.html
Bites of Sweetness: Thank you :) I'm really glad you like the cake and thank you for following me! Can't wait to check out your bread :)
ReplyDeleteBarbara Bakes: Thank you so much!
Hezzi-D: Thank you :) Don't hesitate anymore and give it a chance :D It's not that difficult in fact, just time consuming :)
angela@spinachtiger: Thank you :) Congratulations to your successfull weight loss and I think croquembouche is a great way how to celebrate this :) I bet you're gonna love it :)
D+B: Thank you for your nice comment and following me :) I'm totally open to sharing new recipes and so on, too :) Your blog is great!
Bundle Wade: Don't wait any more and give it a try :) I bet you and your mom will create a beautiful croquembouche! It just takes a lot of time, but it's not that difficult :) The cream really is yummy, though a bit runny :D
Katie @ This Chick Cooks: Thank you so much for your lovely comment :) And hank you for highlighting my recipe on your site :)
Desi: Thank you! I so happy you like my blog :) Thank you for the award :)
OMG this is soooo pretty!
ReplyDeleteI love how u explained everything step by step and the way u brought this work of art and beauty together!
And yeah the pink hearts (are they cookies) are so so so super cute!
Thanks for linking up last week on Whisking Wednesdays. I hope to see you back again this week.
ReplyDeletehttp://pinchofthisthatandtheother.blogspot.com/2011/06/whisking-wednesdays-6.html
♥Sugar♥Plum♥Fairy♥: Thank you so much!! And yes, the pink hearts are homemade spice cookies :) I'm so happy you like the post :)
ReplyDeleteryobious: You're welcome :) I've been sooo busy this week, but the next one I'll link up for sure!
Congrats! You were in this week's top 6 on A Themed Baker's Sunday! Come back for this next week's theme: 4th of July! If you've made anything for the 4th, come show it off!!
ReplyDeletehttp://cupcakeapothecary.blogspot.com/2011/07/themed-bakers-sunday-12.html
Alyssa
blkenigma888: OMG! Thank you so much! Unfortunately, I've just returned from a whole week trip so there's nothing baking in the kitchen, but next week I'm in again!
ReplyDeleteCongrats again! You were featured in A Themed Baker's Sunday Best of 2011!! There is a button you can pick up at my blog for being featured. Please come back this Sunday where the theme will be Citrus's! Looking forward to seeing you!
ReplyDeleteCupcake Apothecary
http://cupcakeapothecary.blogspot.com/search/label/A%20Themed%20Bakers%20Sunday
blkenigma888: Wow! Thank you very much for this! I'm so grateful :)
ReplyDelete